
Free Ground Shipping
for web orders over $50
Updated to include macOS Sequoia.
Most searches on your Mac can be done quickly and easily by clicking  and typing either the name of or a word contained within the file you need. Sometimes, though, a more refined search is necessary. To begin an refined search, open a new Finder window by pressing Option-⌘-Spacebar, or by clicking the Finder icon in the Dock.

If running Big Sur or newer, click  in the upper right of the Finder window to show the search field (in older versions of macOS, it shows by default), then type your query into the search field. You can type all or part of the name of the file, any words written in the file itself, the file extension, the date it was saved (or terms like TODAY, LAST MONTH, etc.), or anything else that could identify the file.
As you type, possible matches will begin to appear in the Finder window. Also, a drop-down list will appear below the search field, giving options that could narrow your search further. Click one of these options to choose it, or press return to dismiss this list and see all results.
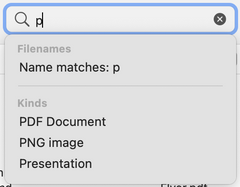
If you choose an option from the drop-down list, your query will show in the search box in an rounded rectangle with the option you chose to the left.

You can now enter additional criteria in the search field to the right of that rounded rectangle. For example, if I had a movie file I had created today today, I could type “movie”, choose FILE TYPE from the drop-down list, then type “today” in the search field too.

You can add as many identifiers as needed in the search field to further narrow the results. To limit where you are searching, click THIS MAC or the name of the folder that was open when you started the search, in the search bar above the results.
Searches can also be saved and for later access. The results of a saved search are always updated in real-time, so if a file that meets the search criteria is added after the search is saved, it will show up in the search results the next time the search is accessed. To save a search, click  in the search bar, type a name for the search in the SAVE AS field, ensure the ADD TO SIDEBAR box is checked, then click SAVE. These saved searches now show in the sidebar of the FINDER WINDOW.
Jason Merrill, Mac & iOS Consultant